I have a 24/7 server running on a Vicharak board, which will be shipped to clients as part of a product. I don’t want clients to have direct access to the board, so I’m considering enabling Kiosk mode and allowing users to interact only with the server running on localhost.
This entire setup currently works on a Raspberry Pi 4B using the Bookworm CLI image. However, I want to transition to the Axon board.
I attempted to replicate the setup using the same scripts on the Ubuntu 22.04.5 minimal image, but due to Snap being the default package manager, the scripts aren’t functioning as expected. Even switching to APT hasn’t resolved the issue.
Is there a workaround for this? Alternatively, is there a Raspberry Pi OS Lite or Debian Bookworm CLI image available for the Vicharak board?
There will be debian bookworm image in the future, but that is not in the timeline right now.
This the problem is from the ubuntu side only, they are making us to use snap only, Which makes things improper!
Running apt install for let say firefox, it tries to install it with the snap without checking any dependencies and snapd daemon.
All we can do is to directly install that from the snap instead of the apt,
# Install snap core first
sudo snap install core
# Then install the package i.e. firefox
sudo snap install firefox
It may take sometime to install, please do not interrupt in between as I have seen snap installation getting stuck way often then apt.
The default package manager is apt, but when you try to install Chromium through apt, it is going to be installed from snap.
Is it possible to upload a script over here?
Again, Flash Raw Image in SD Card.
-
sudo resize-helper
-
sudo apt update
-
sudo apt install xserver-xorg-core x11-utils xinit openbox
-
Now, run the command below to display :
startx
Now, go to another tty terminal using ctrl + alt +f2/f3/f4/f5
-
Install Chromium:
sudo apt install chromium-browser
It may take time to install Chromium, as in the backend, it uses snap to install.
-
Run below command
sudo /snap/bin/chromium --no-sandbox --kiosk <*.html> http://localhost
1 Like
I won’t be able to, as that script comes under our company’s confidential resources. However, I can send you the Kiosk part of it. If it works?
Updated Minimal Raw Image with chromium support
- Flash above image in SD Card
- Insert into Axon, Wait for a while as it goes into first boot mode and reboot again automatically
- Now, below you can find
xserver setup with Chromium Kiosk mode.
- Follow Below steps :
sudo chmod +x kiosk-setup.shsudo ./kiosk-setup.sh- Reboot the axon board.
Chromium will be opened automatically on system boot.
If you want to stop it, then run below command
sudo systemctl stop kiosk-x-tty1.service
sudo systemctl disable kiosk-x-tty1.service
sudo systemctl daemon-reload
To run Chromium: chromium
You can modify /usr/local/bin/startx-tty1.sh according to your use case.
kiosk-setup.sh (1.7 KB)
If you have any query, Mention it here so we can track it properly.
Perfect, this image and script worked for me. Thanks guys
1 Like
Also how can I disable following interfaces from my board:
- WiFi
- BT
- GPIO
- UART
- USB (Only allow keyboard mouse)
And how can I change splash image to my logo, also removing all the boot text?
To Disable Interface to use
WiFi
sudo nmcli radio wifi off
sudo rfkill block wifi
Bluetooth
sudo rfkill block bluetooth
Flash server image in eMMC
-
Assume that you have already installed the latest eMMC Ubuntu 24 Noble GUI image in the eMMC media storage device in Axon.
-
Download Minimal Server Image which can be flashed in eMMCa and SD Card as well.
Download Minimal Server Image
> **_NOTE:_** Don't forget to untar image properly.
tar -xvf <image>.tar.gz
-
Connect the Type-C To USB Wire from Axon To the Host PC.
-
Now, when the Vicharak Logo appears on screen (HDMI-1), continuously press Ctrl + Q and the U-boot menu will appear on screen.
-
To Select U-boot-console menu, Press Enter.
-
Run ums 0 mmc 0 command.
-
Now, the eMMC storage media is detected in the Host PC.
-
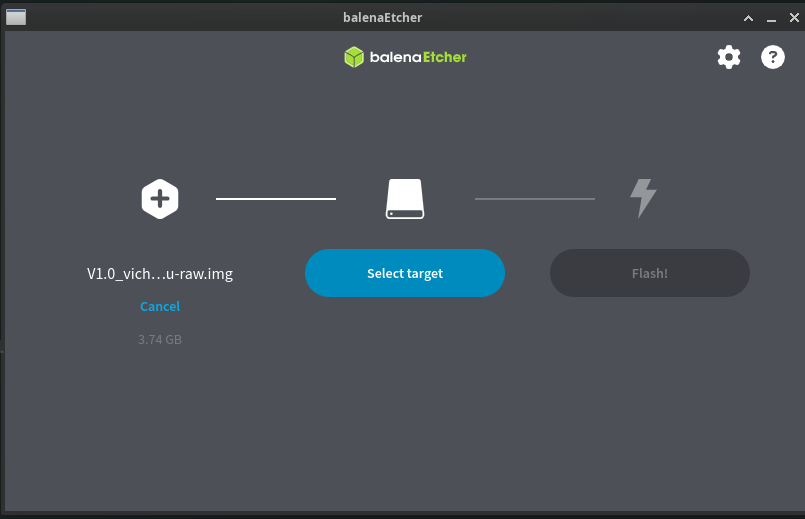
Using Balena-etcher, you can select the downloaded minimal image, which is the same for eMMC and SD Card in the first step.
-
You can see that eMMC is detected in Host PC.
-
Click on Flash.
-
It takes a few minutes to complete.
-
Go to Axons’s HDMI Screen and press Ctrl + C.
-
Run reboot command.
Axon will be booted from eMMC.
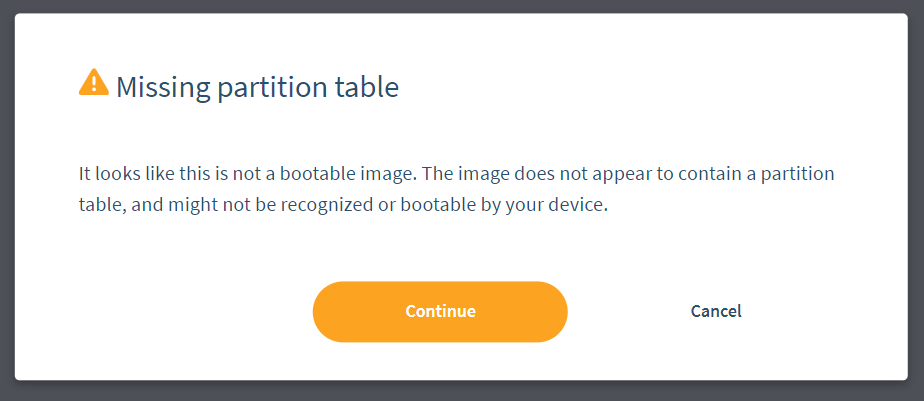
While selecting the given image in balenaEtcher, it’s giving me the following warning
Could you send selected image name ?
V1.0_vicharak_axon_5.10_26072025-ubuntu_22.04-jammy-minimal-beta-all.tar
Make sure you have untared it.
tar -xvf <image>.tar.gz
ah shit, my bad… now I’m feeling embarrassed lol, I didn’t untar it
Thanks
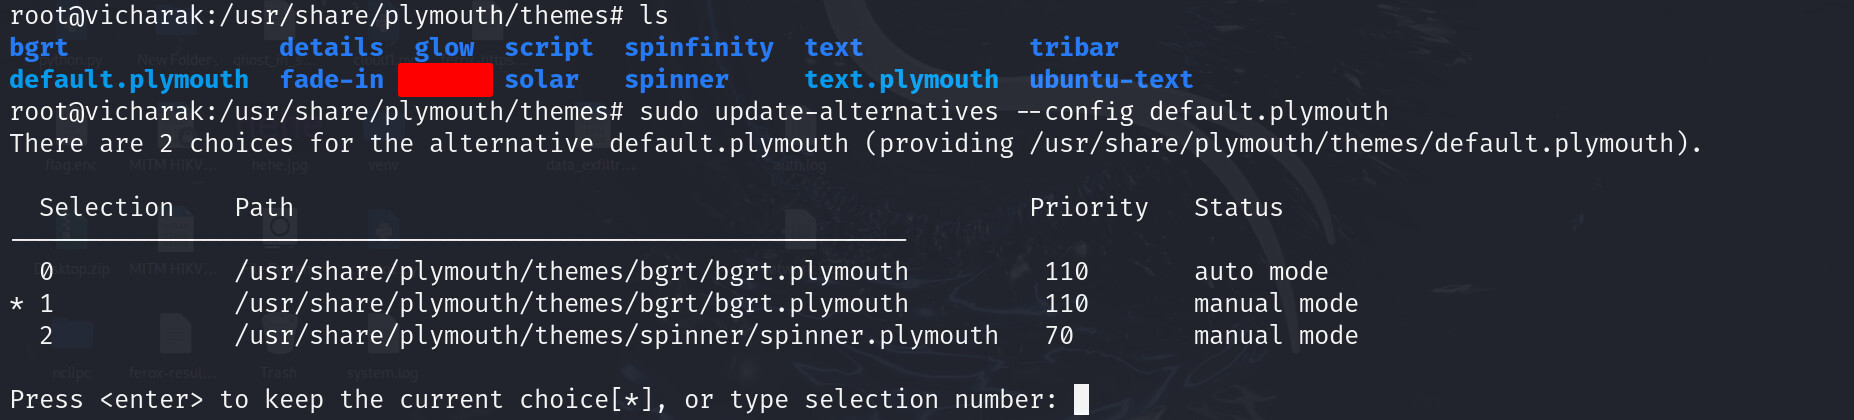
I tried changing splash screen logo, but when I run sudo update-alternatives --config default.plymouth it does not show all the themes.
Then I tried overwriting bgrt.plymouth with mine. I did that, and then it doesn’t show any splash screen.
This is because, by default, we have not installed or previously used any other themes in Linux, which is why it does not show all the themes.
Your theme includes a logo or just text animation?
I tried using the theme given in your guide, i.e:
[Plymouth Theme]
Name=Your Theme Name
Description=Custom Splash
ModuleName=script

[script]
ImageDir=/usr/share/plymouth/themes/your-theme-name
ScriptFile=/usr/share/plymouth/themes/your-theme-name/script.lua
And when this theme wasn’t shown in the config menu, I replaced bgrt.plymouth’s content with this content. And then after the splash screen stopped displaying.
Ensure you have updated sudo update-initramfs -u after applying the changes.
And have you tried to preview applied changes?
sudo plymouthd
sudo plymouth --show-splash
sudo plymouth --quit